Latte art can seem like a mysterious talent reserved only for the most skilled baristas, but did you know you can do it at home? With a little practice and the right tools, you too can create fun and beautiful designs to brighten up your morning coffee. In this article, a professional barista shares expert techniques and easy-to-follow steps for mastering the basics of latte art at home. Learn three classic designs, including the heart, tulip and rosetta, as well as professional milk steaming techniques. We’ll also cover why milk choice can be critical to your latte art success. We’ll help you go from complete beginner to confident home barista.
What is Latte Art?
Latte art is creating a design on the top of a cup of coffee by precisely pouring steamed milk. It adds a touch of creativity and beauty to a coffee and shows that the milk has been properly steamed to the right texture and taste.
Latte art is primarily about pouring perfectly steamed milk at just the right speed and rate to create a pattern or design. This is what we’ll be focusing on in this article. The other main technique is etching, where a barista uses a toothpick or other tool to draw more complex or finer details into the poured milk.
Latte art can be as simple as a heart shape or as complicated as fully detailed animals or complex patterns. For beginners, it’s best to master some basic shapes before moving on to more complicated designs later.
What You’ll Need for Latte Art
Essential Equipment
- Espresso machine with steam wand (or alternatives - see below)
- Milk jug/jug, ideally stainless steel with 350ml-600ml capacity
- Thermometer
- Fresh, cold milk (Arla Cravendale whole milk is ideal)
- Freshly ground coffee
- Wide, shallow coffee cup
Can you do latte art without an espresso machine?
Yes, it’s possible to do latte art without an espresso machine, though it can be a bit more challenging. Nothing really beats a steam wand to get the milk to the right texture, but you can still achieve some good shapes using other techniques.
- French press - You can use a French press by adding hot milk (heated to between 55°C and 65°C) and pulling the plunger up and down until the milk becomes foamy and frothy. This won’t achieve a smooth and pourable microfoam, but you’ll have something to work with.
- Milk frother - You could also use a handheld milk frother to whisk up some heated milk, but this has the same limitations as the French press method. You’ll get some good foam, but not the fine texture achieved with a steam wand.
These methods provide an alternative to investing in an espresso machine with a steam wand, but just remember that they won’t provide quite the same results.
The Perfect Milk for Latte Art
Milk choice is a good place to start, as this can make a huge difference to your success when you’re just starting out. The best milk for latte art is usually whole milk, as the fat content creates a silky, creamier texture.
Cow’s milk is also the usual choice for baristas creating latte art. Cow’s milk is generally the easiest to work with for beginners.
The protein in cow’s milk is also very important, as the steam breaks it down to create a stable membrane that traps the tiny air bubbles that form the microfoam. Arla Cravendale Whole Milk provides the perfect balance of protein, fats and sugars to create a creamy and stable froth. Semi-skimmed can also work perfectly well, but can be harder to master until you’re confident in your milk steaming technique.
How to Steam Milk for Latte Art
The Two Phases of Steaming
Before we start steaming our milk, it’s useful to understand the different phases that take you from a jug of cold milk to the perfect microfoam. These two phases are:
Aerating - This is when you’re adding air to the milk to create bubbles. The steam breaks up the surface of the milk, injecting air into it like a whisk. This is why it’s important in this stage to keep the steam wand just below the surface of the milk. Too deep and you’ll just be heating the milk rather than aerating it; too shallow and you’ll be blasting in large bubbles that won’t give you a smooth and creamy foam at the end. The sound can help to guide your steaming at this point. You should be getting a gentle hissing (like ‘tss tss’) as the milk aerates. If it’s making a loud and unpleasant screeching sound, it means the wand is too deep in the milk.
You should aerate the milk until it reaches body temperature (37°C), at which point you should switch to the texturing phase.
Texturing - Phase two of steaming starts with lowering the wand further into the milk, maintaining a vortex as the steam swirls the milk around. This means you’re not adding any more air, but you are continuing to heat the milk, helping to break down its proteins and trap the tiny air bubbles to create the microfoam.
The milk should be heated to around 60-65°C. You can use a thermometer for accuracy, or steam until the metal jug is just about too hot to touch for more than a second. The milk should look glossy and creamy with a fine texture.
Step-by-Step Milk Steaming
- Start with cold milk from the fridge. Pour in your Arla Cravendale, leaving plenty of room in the metal jug as the milk will expand during the process.
- Heat up and purge the steam wand on your espresso machine, making sure there’s no water to dilute the milk.
- Position the tip of the steam wand at a slight angle about halfway between the centre and the edge of the jug. This will help to create that whirlpool effect.
- Keeping the jug straight, submerge the tip of the steam wand into the milk and start up the steam.
- Immediately start lowering the jug until the steam wand is just below the surface of the milk, causing it to swirl around. Listen for the gentle ‘tss tss’ hissing sound. This is when you know you’re in the right position.
- Hold the jug still until the milk is warmed to body heat, which should only take a few seconds.
- Now raise the jug again so the steam wand is submerged and not adding any more air to the milk.
- Continue steaming until the jug becomes too hot to touch for more than a second.
- Turn off the steam and remove the steam wand from the milk.
- Give the jug a couple of taps on your kitchen counter to help remove any large bubbles, and gently swirl it to maintain the texture.
- It’s now ready to pour over your coffee and create your latte art.
What Perfect Microfoam Looks Like
Getting used to what perfect microfoam looks like will help you to know when it’s ready to use to make your art. It should have a glossy sheen, looking almost like wet paint. You also shouldn’t be able to see any bubbles.
If your foam is very frothy and bubbly, too much air has been introduced with the steam wand, most likely because the tip was held too high in the milk. If there are no bubbles at all, the wand was too deep in the milk - you’ve just heated it rather than made any foam. If your milk gets too hot, the texture can fall apart quickly, as well as ruin the taste. It should be creamy and sweet if it’s been heated and aerated properly.
Latte Art Techniques: Three Classic Designs
Heart Latte Art - Ideal for Beginners
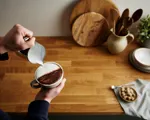
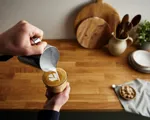
- Pour your perfectly steamed milk into the centre of the coffee, holding the jug around 10cm above the cup.
- Pour steadily until you’ve got about a third of the milk left in the jug.
- Bring the jug close to the surface of the milk and pour to form a white circle on the surface of the coffee.
- Finish by pouring the last of the milk in a line through the centre of the circle, forming the heart shape.
Beginner tips:
- Practise pouring at different heights and speeds to get a feel for how the steamed milk reacts.
- Don’t worry too much about perfect shapes and symmetry at the beginning. Just get used to pouring and making consistent shapes in the coffee.
Tulip Latte Art - Building Your Skills
- Begin the same way as the heart latte art.
- Form your first circle on one side of the cup.
- Move the jug over slightly to pour another circle overlapping the first.
- Move the jug over again to pour a third, final circle.
- Pour a line back through the centre of all the circles to form the tulip.
Progression tips:
- The tulip will be much easier to make once you’ve mastered the heart shape, as they share the same techniques.
- Aim to make consistent circle sizes to create a symmetrical and even tulip.
Rosetta Latte Art
- Pour a circle in the centre of the cup as with the heart latte art.
- Once the cup is about half full of milk and you’re down to the last microfoam in the jug, lower it to the surface of the coffee.
- Keep pouring steadily while slowly wiggling the jug from side to side.
- As you move the jug, layers will start to form and spread out like leaves across the surface, slowly forming the rosetta shape.
- Once the pattern has filled the surface, pour one final line through the centre to create a symmetrical finish.
Mastery tips:
- It might take a couple of tries to find the right rhythm when wiggling the jug, but this is the key to making the rosetta pattern.
- Your first few attempts may come out a bit more blob-like, but don’t be discouraged. It’ll take a few tries to get that defined leaf shape.


Common Latte Art Mistakes and How to Fix Them
My milk won’t create patterns
Problem: The milk texture is wrong
Solution:
Achieving proper microfoam is essential for creating patterns, as it needs to hold together but also not be too stiff. Make sure you’re not overheating your milk - no more than 65°C, and make sure you’re starting with Arla Cravendale fresh, cold milk. Practice getting the microfoam texture every time before you try creating patterns.
Patterns disappear immediately
Problem: Milk and coffee aren’t properly balanced
Solution:
Always use a freshly made cup of coffee for your latte art - the crema actually helps the patterns hold on the surface. The size of the cup is also important, as you need a wide rim and a shallow bowl to have room to make shapes and patterns. The texture of the milk needs to be stable, too. If there isn’t enough microfoam, the milk will just spread out and mix with the coffee when you pour it in.
I get big bubbles in my designs
Problem: Over-aeration during steaming
Solution:
Check the position of the steam wand when you’re steaming - if it’s too high, it’ll introduce too much air into the milk, leaving big bubbles that won’t cooperate when it comes to making latte art. Make sure to tap the milk jug a couple of times after steaming to break up any bigger bubbles, too.
My steamed milk is too thick or too thin
Problem: Incorrect steaming technique
Solution:
A steamed milk that comes out too thick and difficult to pour means it’s too dry and frothy. If it’s too thin, it’s not frothy enough, or it could be overheated. Heating the milk too much breaks down the delicate structure holding the tiny bubbles in the microfoam. Try using a thermometer for accuracy until you get a feel for when the milk is ready.
I can’t pour without splashing
Problem: Pour control needs work
Solutions
Getting a steady pour can take a bit of practice. The best technique is to start higher up for the initial pour, then move closer to the cup when creating the latte art. It’s also important to pour confidently and smoothly, or you might break up the shapes you’re trying to create.
Tips for Practising Latte Art
Set Realistic Expectations
It’s easy to lose heart when your first attempt doesn’t go well, but creating latte art can take many tries before you get something good. You’ll probably spend the first few tries just making blobs and splotches, which is absolutely fine. Professional baristas make it look so easy, but remember that they’ve made thousands of coffees while honing their skills. Focus on getting the milk texture right first, then gain confidence making shapes and patterns.
Practice Efficiently
A cup of coffee is always welcome, but you don’t need to make hundreds of extra espressos to practise your pours. Save the coffee by using food colouring mixed with water instead, or you can mix used coffee grounds with water as a substitute. You can even save on milk by practising with water and a little washing-up liquid. It’ll foam in a similar way when steamed, then you can perfect your skills without spending a fortune on milk.
Track Your Progress
Take photos of your attempts at patterns so you can see your skills improve over time. You can even take notes when something goes wrong, so you can remind yourself why something didn’t turn out quite right and learn from it. It may take some time, but you will see yourself improve - and making mistakes is the only way to do it.
Latte Art FAQs
Whole milk is the easiest to work with for latte art, thanks to the protein and fat content that helps to create a stable microfoam. Semi-skimmed can also work well, but is less forgiving for the beginner.
Everyone learns at a different pace, but it can take dozens of attempts before you start making recognisable latte art shapes. More complex designs can take weeks or even months of practice to get right when you’re just doing it at home. Don’t forget, those professional baristas make hundreds of coffees every week, so they have much more opportunity to perfect their craft.
No, latte art needs milk that’s been steamed, or at the very least heated and frothed. Cold milk doesn’t have the right consistency to create a pattern or hold a shape on the surface of hot coffee. The steaming process is what creates the right texture for latte art.
An espresso machine with a steam wand will give you the best results for latte art, but it’s possible to create frothy milk with a French press or handheld frother. These will result in much coarser foams, however, making it difficult to create precise shapes and patterns.
Consistent results only come with practice, so it can take some time before you’re able to reproduce a good shape or pattern every time. Just keep perfecting every step, from achieving the right texture in the milk to expertly pouring it into the coffee.
Yes, you can use both skimmed and semi-skimmed for latte art, though they can take a bit more practice to get the desired microfoam texture when steaming.
The ideal temperature for steamed milk is 60-65°C. This provides a silky, pourable texture for latte art, as well as a sweet, creamy taste. If milk is overheated during steaming, the microfoam structure loses stability, making it hard to create latte art.
The perfect microfoam has a glossy appearance, almost like wet paint. The bubbles should be so small that they’re not visible, instead creating a smooth and silky texture that moves fluidly and is easy to pour.
Latte art requires a silky, pourable microfoam for creating shapes on the surface of the coffee. Cappuccino foam is generally much drier and thicker, better suited for simpler designs or stencilling with cocoa.