Panini bread

Panini sandwiches are a delicious Italian classic that gets even better when made with homemade, fresh panini bread. With this recipe, you can prepare bread perfect for making grilled panini sandwiches. As the bread freezes well, you even have the possibility of popping them into the freezer, so you always have some good panini bread at hand when you feel like treating yourself to an easy Italian-inspired lunch or dinner.
Ingredients
Panini bread:
|
100 g
Quark 0,3%
|
|
|---|---|
|
100 ml
Water
|
|
|
10 g
Yeast
|
|
|
1 tbsp
Olive oil
|
|
|
½ tsp
Coarse salt
|
|
|
100 g
Whole grain durum flour (approx. 1½ dl)
|
|
|
100 g
Wheat flour (approx. 1¾ dl)
|
Brushing:
|
Beaten eggs
|
|---|
Instructions
Tips
To ensure a tender-crumbed and soft panini bread, it is paramount to treat the yeast right. A yeasted dough needs time to rise properly. However, before this rise can be achieved, the yeast must be properly activated by a lukewarm liquid. It is important to use tap water that is lukewarm to the touch or ideally 37-42°C. Using water that is more than 60°C will kill the yeast, preventing the dough from rising.
Tips
As our recipe calls for both water and quark, make sure to let your quark reach room temperature and use water that is a little warmer than lukewarm to make your liquid mix. Dissolve the yeast in the warm mixture by crumbling it using your fingers. Let the mixture sit for five to ten minutes to see if the yeast has been activated properly. If it has, the mixture should turn bubbly or foamy, and you can now add the dry ingredients and get on with our recipe for panini bread.
Questions about panini bread
With our easy panini bread recipe, you can serve a deliciously crispy lunch or light dinner with an array of different filling options. Read on to learn a bit more about the bread type by looking at our answers to some of the most frequently asked questions about panini bread.
What is panini bread?
In Italian, panini means little bread roll, however, the word is most often used to refer to the grilled sandwich dish the oblong bread type is used to make. Different types of panini bread can be used to make these delicious sandwiches and making a homemade kind using both regular wheat flour and durum flour will make for a great lunch or snack.
How to make panini bread?
Making panini bread from scratch is not difficult but requires a little patience. Make sure to activate the yeast and wait for the dough to proof properly before shaping and baking it. After allowing the bread to cool for a bit, split it open and prepare the panini sandwiches with the fillings of your choice before toasting them. Serve these Italian grilled sandwiches as a lunch or snack if you are feeling peckish.
What does panini bread look like?
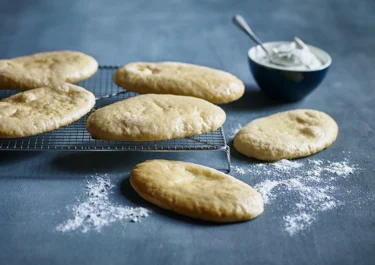
Panini bread is known for its characteristic oblong shape as they are long, slightly thin pieces of bread. Some are quite square-looking, while others have more rounded corners. Though you can of course make round panini bread, this may make them slightly more difficult to toast if you are using a panini press or sandwich toaster to give them their classic grill marks.
What to do with panini bread?
Bread of this type should be split open and stuffed with your favourite panini bread fillings. You can go for a combination of fresh or roasted vegetables and lunchmeats or an entirely vegetarian option. Using a spread like pesto or hummus and a soft, meltable cheese like mozzarella will work well with the crispy texture the bread gains when you toast it.
Can you freeze panini bread?
You can easily freeze panini bread to always have them at hand when you are in the mood for something easy and scrumptious. Simply wrap your panini bread in cling film or aluminium foil and place them into airtight containers or freezer bags. Make sure to cool the bread before wrapping it. Otherwise, the condensation it creates may lead to it becoming soggy. In the freezer, your homemade bread will last for up to 3 months. When you are ready to make yourself a panini sandwich, let the bread thaw on the countertop for an hour or so or overnight in the refrigerator if you know that you will be using it the next day.
Easy homemade panini bread
Italian panini bread has a crispy, golden crust and a soft and tender crumb that make the bread perfect for grilled sandwiches. When grilled, the bread gets a deliciously crunchy texture that pairs well with soft spreads and fillings, making it a great option for a light lunch or a snack. This homemade bread has a subtle nutty flavour that is present without being overpowering stemming from the whole-grain durum flour. This means you can fill it with practically any type of vegetable or lunchmeat and get a delicious result.
Feeling inspired to bake even more homemade bread to use for lunch and dinner? Have a look at our recipes for flatbread, pizza dough, and pita bread as well. Like this recipe for panini bread, these easy-to-follow bread recipes present you with a wealth of opportunities to experiment with different toppings and fillings.
Make a grilled panini sandwich
To make the perfect panini sandwich, split open the fresh or thawed bread and fill it with vegetables, deli meats, and a cheese of your choice. Heat your panini press or sandwich toaster before placing your paninis into it and pressing down well. Cook the paninis until the bread is golden and has clear grill marks on its surface and the cheese has melted.
Ideas for panini bread fillings
Good panini bread tastes great with an assortment of different fillings. A classic combination is a green pesto, tomato slices, sliced onions, cheese, and deli meats. Using a soft Italian cheese like mozzarella is a good option as it melts very well when you grill the panini sandwich. This cheese also pairs well with most lunchmeats so whether you like serrano ham, chorizo, salami, or sliced chicken or turkey better, there is a perfect combination out there for you.
If you would like some vegetarian options, you could find inspiration in our avocado toast and fill your homemade paninis with salted and peppered avocado, sliced cherry tomatoes, and rich cheese. Pairing a homemade hummus with roasted red peppers, olives, crumbled feta cheese, and some rocket or baby spinach will also make for a delicious vegetarian filling for your bread.
Taste the difference with durum flour
It is possible to make different types of panini bread depending on what types of flour you use. Durum flour has a slightly nutty flavour and aroma that works wonderfully for paninis. Using durum flour also gives your bread a beautiful golden tint not achieved with a plain white panini bread made using only wheat flour. Durum flour, however, gives the bread a denser crumb akin to whole wheat bread, as such, using a mix of durum and wheat flour as our recipe calls for is perfect as you get the best of both worlds with a rustic panini bread with a sweet, nutty flavour, a slightly golden crust, and a light and airy crumb.
Make it your own
If you wish to play up the subtle nutty flavours brought to this homemade bread by the use of durum flour, you can choose to sprinkle sesame seeds on top of your paninis. Simply add them to the pieces of bread after brushing them with beaten egg. As your paninis bake, the sesame seeds will be toasted and gain a stronger, delicious almond-like flavour. Introducing fragrant nigella seeds into the mix will make for an even more complex flavour profile as these seeds are slightly more bitter and have a taste reminiscent of that of toasted onion. The combination of the two kinds of seeds is wonderful and gives your homemade paninis an enticing look. If you are feeling creative and adventurous, you could even experiment with creating a pattern like stripes or swirls with the light sesame seeds and dark nigella seeds.


