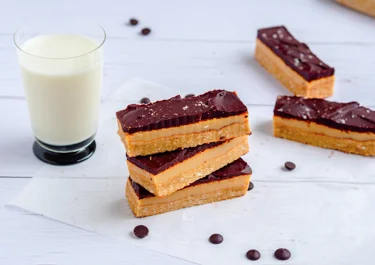
Salted caramel protein bars

Discover the joy of our salted caramel protein bars, where rich caramel gets a hint of sea salt and a dark chocolate coating. Made with a sweet almond flour base, these bars blend crisp, smooth, and creamy textures. They're perfect as a source of protein or a sweet treat with your coffee. Easy to make and delightful to eat, these bars balance sweet and savoury for a snack that's truly indulgent.
Ingredients
|
120 g
Almond flour, defatted
|
|
|---|---|
|
10 g
Coconut flour
|
|
|
80 g
Brown sugar
|
Salted caramel
|
200 ml
Condensed milk
|
|
|---|---|
|
15 g
Butter
|
|
|
1 pinch
Flake salt
|
Chocolate layer
|
100 g
Dark chocolate, 70%
|
|
|---|---|
|
15 g
Butter
|
Instructions
Questions about salted caramel protein bars
First time making these delicious bars? Not to worry; they are very easy to get the hang of. Take a look at some of the most commonly asked questions regarding this recipe to get some great pointers on the process, from making the caramel to serving suggestions and tips for using up any leftovers.
How do I know my salted caramel is ready?
Your salted caramel is ready when it has thickened and taken on a golden-brown hue. This usually takes about 8-10 minutes of simmering while stirring constantly. The caramel should be smooth and slightly viscous, able to coat the back of a spoon. Be cautious not to overcook it, as it can quickly turn too thick or start to burn, altering the desired texture and flavour.
What can I serve with my salted caramel protein bars?
Enhance your enjoyment of salted caramel protein bars by pairing them with a variety of complementary treats. Serve alongside other bars or cookies to create a diverse and appealing snack platter, perfect for sharing with friends or enjoying as a solo indulgence. For inspiration, head over to our ultimate guide on protein bar recipes or our list of best protein cookies to make at home. For a rich and creamy accompaniment, try this indulgent protein chocolate mousse. The mousse's velvety texture and deep chocolate flavour beautifully contrast with the crisp, sweet, and salty notes of the protein bars, creating a balanced and luxurious experience. To add a refreshing contrast, pair your bars with a mango protein smoothie. The bright, tropical flavours and creamy consistency complement the rich caramel and chocolate layers, providing a delightful mix of textures and flavours, perfect for any time of the day.
What can I do with leftover salted caramel?
Leftover salted caramel can be used in a variety of ways. Drizzle it over ice cream, pancakes, or waffles for a sweet treat. Use it as a dip for apple slices or pretzels, or stir it into coffee or hot chocolate for a caramel-flavoured beverage. You can also incorporate it into other baking recipes, such as brownies or cupcakes, for an extra layer of flavour.
Master the art of layered salted caramel protein bars
To perfect the layers, focus on achieving the right textures and flavours for each layer.
- For the base layer: ensure the almond flour base is evenly pressed and baked to a golden hue to provide a sturdy foundation.
- For the caramel layer: continuous stirring while simmering prevents burning and ensures a smooth consistency. When adding the flake salt, do so carefully to enhance the caramel’s sweetness without overwhelming it.
- For the chocolate layer: melt slowly over a water bath to avoid seizing, resulting in a glossy, rich finish.
Allow ample chilling time to ensure the layers set properly, making slicing into neat bars effortless.
Proper storage for freshness
Store your salted caramel protein bars in an airtight container to maintain freshness. Keep them in the refrigerator if you plan to enjoy them within a week. For longer storage, freeze the bars in a single layer on a baking sheet before transferring them to a container. This method prevents the bars from sticking together and ensures they retain their texture and flavour. Always allow the bars to reach room temperature before serving for the best taste experience.
Cutting techniques for perfect salted caramel protein bars
To achieve clean cuts, ensure the bars are fully set and chilled. Use a sharp knife dipped in hot water, wiping it dry between cuts. This prevents the chocolate layer from cracking and the caramel from sticking to the knife.
Measure and mark even portions before slicing to maintain consistency. Cutting on a hard surface with a gentle sawing motion helps preserve the bar’s layered structure and presentation.
The role of salt in salted caramel protein bars
Salt plays a crucial role in this recipe, enhancing and balancing the sweetness of the caramel and chocolate layers. By adding a pinch of flake salt to the caramel, you not only intensify its rich, buttery flavour but also create a delightful contrast that prevents the bars from becoming overly sweet.
This balance makes the flavours more elevated and complex. Additionally, the salt enhances the overall depth of the bars, highlighting the natural sweetness of the brown sugar and the rich, dark chocolate. This sweet and savoury interplay is what makes salted caramel protein bars irresistibly indulgent, turning a simple snack into a gourmet treat.
Chocolate melting techniques
Melt the chocolate using a double boiler method to ensure a smooth, even consistency. Place a heatproof bowl over a pot of simmering water, ensuring the bowl doesn’t touch the water.
Add the chocolate and butter, stirring gently until fully melted. Avoid overheating, which can cause the chocolate to seize. Alternatively, use a microwave in short bursts, stirring between each interval until smooth.
Texture and consistency tips
Try these extra steps to level up the texture and consistency of your salted caramel protein bars:
- Slightly underbake the almond flour base: reduce the baking time by a minute or two to ensure it remains slightly chewy and doesn’t become too hard.
- Use a silicone spatula when preparing the caramel: it scrapes the sides of the pan more effectively, preventing grainy sugar crystals from forming.
- First cool the bars at room temperature: before refrigerating, first cool the bars at room temperature, ensuring the layers set properly.
- Place parchment paper on the chocolate: once assembled, place a piece of parchment paper directly on top of the chocolate layer before refrigerating; this prevents condensation from forming, which can affect the texture.
By following these tips, you'll achieve gourmet-style bars with a perfect balance of crunchy, gooey, and crisp textures, making each bite a delightful experience.
Pressing techniques to get the base just right
To achieve a firm and even base, press the mixture into the lined mould firmly using the back of a spoon or a flat-bottomed glass. This ensures the base holds together well after baking and provides a solid foundation for the caramel and chocolate layers. Pressing evenly also helps the bars maintain a uniform thickness throughout, enhancing both appearance and texture.


